
Wardrobe Execution - Outfit #4
- Kerry M

- Mar 28, 2022
- 3 min read
While most people are posting about their spring sewing plans, I'm still finishing my fall/winter ones. I'd like to say I have learned from this experience and am going to be less ambitious for spring/summer, but that would be a lie.

In my original plan, I had a dress with an asymmetric skirt and some fun with plaid. It was inspired by these two Alexander McQueen ready to wear dresses (and The Closet Historian's version of the second).


In my sketch, I was assuming the plaid manipulation on the first dress was via a yoke and two bias panels. In studying it more, however, it became clear it was in fact a horizontal bust dart that causes the plaid to bend.

For the skirt, I knew I wanted to use M7351 for the handkerchief hem side of the skirt and Charm Patterns Stanwyck for the pencil skirt side. (I previously used M7351 for one of my flannel tunics.) For the bodice, however, I went through a few patterns before settling on the Cashmerette Upton.
I've never made it before, so I toiled the sleeveless, two dart bodice first - and then once I knew it fit, I rotated the darts into a horizontal center dart. I deliberately brought the point of the dart all the way to the apex because I wanted a pointed architectural look.
Despite using three different patterns, they fit together into a toile quite well.


I made a few minor adjustments and then charged ahead with cutting the fabric. My fabric was a beautiful plaid wool from Emma One Sock fabrics.

It isn't a symmetrical plaid, which could have made things complicated, but because the lines are woven in - the back is the same as the front. Since I wanted my pieces to be mirror images across the center back and center front, I cut out one side using my pattern piece and then the other using the one I previously cut.

This was a slow process - as I kept pinning pieces together to double-check them as I went.

The match across the center front and center back are both lovely, but it was impossible (without re-drafting waistlines or side seams - more work than I was willing to put in) to match across the sides. I also didn't want to piece the waistband, so I auditioned different directions and chose the below.

After cutting the main fabric, I cut and sewed together the lining. I used a rayon lining from EOS which feels much nicer than I expected. I used the original two dart bodice for the lining and treated all darts in the bodice and skirt as tucks.


I left the back seam open to make it easier to set into the dress once it was finished. The dress went together quickly, since it was virtually identical in construction to the toile.


Before I sewed it in permanently, I basted in the zipper and did a final try-on. (Please enjoy my messy hair and athletic socks.)


Once the main fabric and lining were complete, I pressed in the seam allowance on the neckline and armscyes and slip stitched them together by hand. Then I slip stitched the lining in around the zipper (and sewed up the bottom of the lining back seam to the bottom of the zipper). Finally, I machine hemmed the lining and hand hemmed the outer skirt.


As a last touch, I tacked the first 6 inches of the center front skirt seams together because the handkerchief side has a tendency to pull the pencil off center.
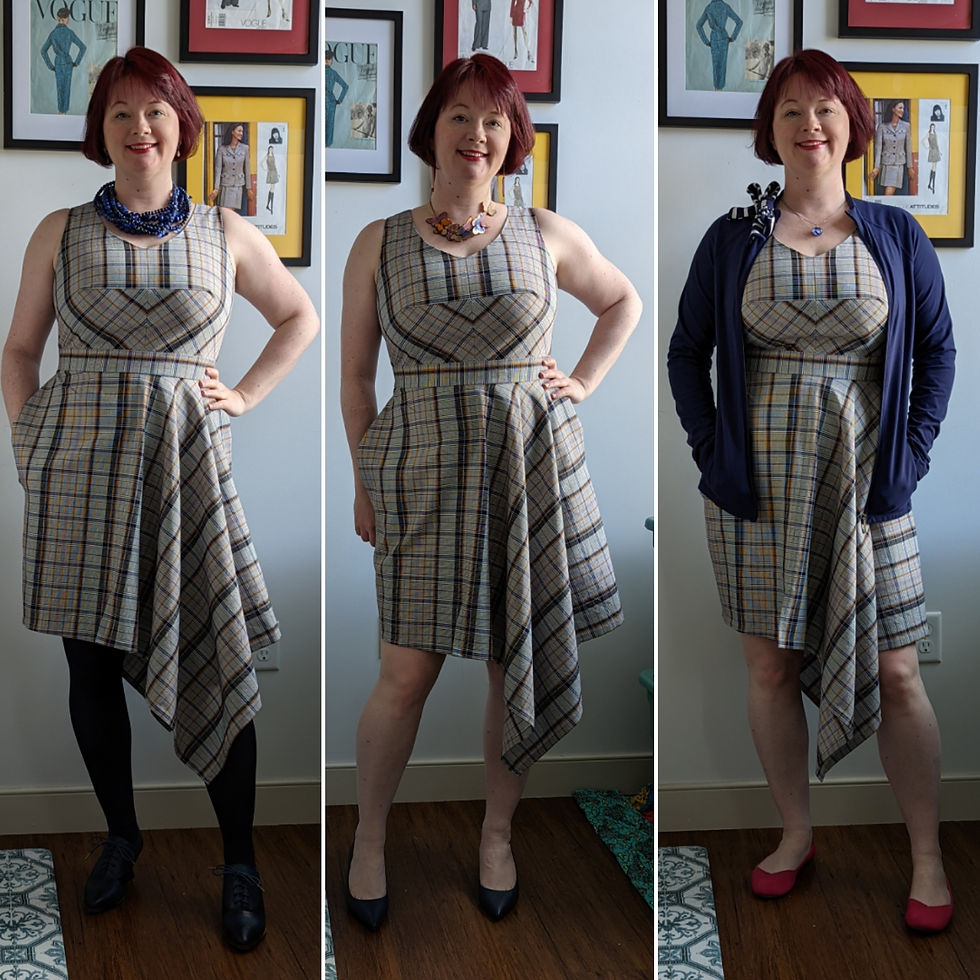
The dress can be more or less dressy depending on accessories and I'm very proud of how closely it matches my vision. I don't love that the side seams don't match, but because of the pockets I think it isn't as noticeable as it might be otherwise.


Comments